Sunday, 26 January 2014
Shadow box - Winged heart
Composition mainly of metal items, such as leafs, chain and aluminum foil. Decorated with swarovski rhinestones and pearls.
Cupcake card

A very special card in a very sweet shape to send your wishes is a Cupcake card!
The template can be found in Cuddly Buddly website and is free!
You can directly print the template on the papers that you will use for the base and the topping. However, as I usually like to make cards that can be kept for long time and in some cases used later to place a photo, you will need to print a spare copy to use when you cut the chipboard, which I have as base to built my card on.
The materials and tools you will need to make this card are:
- chipboard
- 20mm spun cotton balls (you could use various sizes if you like)
- white and purple cardstock A4 size (or choose your colour, pattern etc)
- purple colour aluminium wire
- floral embossing folder
- cart-us nested dies - bracket frames 2
- flowers for decoration
- white and fuchsia ribbons
- embossing powder in two colours cranberry and purple
- UTEE clear powder to use with the Melting pot
- acrylic violet paint
- 3mm rhinestones
- Tim Holtz Distress Ink Pad - Frayed Burlap
- puple and silver inkpads
- scissors and art knife
- paper glue
- hot glue
 First of all download the cupcake template from Cuddly Buddly.
Print a copy to use as pattern and another one on white cardstock sheet for the inside part.
Then print template 2 found in file.
Print the topping part on a white sheet and the lower part on the purple sheet. You will need 2 copies of template 2 (big cupcake). At this point you can enlarge just a little bit the template. This will help cover the chipboard better.

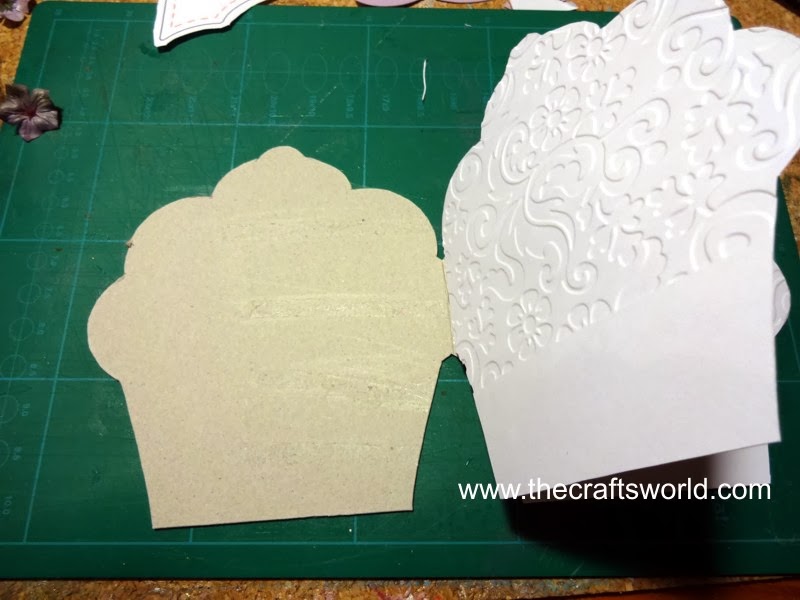
Take an A4 size piece of chipobard and cut along using the printed pattern. I used some repositionable glue to keep the pattern in place.

Your chipoboard base now is ready for decoration!

Take 2 cotton balls and cut them in half and pain them with the acrylic violet paint. Let them aside to dry.

Cut the rest pieces from the cardstocks. Here you can see the different size of the chipboard and the cardstock piece.

Using the floral embossing folder, emboss the inside piece as images shows.

Then emboss the lower parts of the cupcake.
Use the silver inkpad to make shades on embossed design.
Glue the inside piece on the chipboard base.

Have brown shades on cupcake topping pieces....

....and on the embossed inside paper.
Use purple inkpad for the lower part.

Glue the rest of the pieces to the outside of the chipboard. First the cupcake base then the topping.
Melt some UTEE clear powder and add a little of cranberry and purple embossing powders.
When UTEE powder is ready, pure drops on the front cupcake topping and close to the points where you will place the half cut cotton balls.

Using a nested die cut a white label to place it outside the card. Use ink pad for some shades and write a wish or anything you like!

Cut and bend the wires.
Make a bow of the fuchsia ribbon.
Using hot glue place the cotton balls, the ribbons, the wires and at the end the bow and the flowers to cover the ends of wires.
Add rhinestones to look like sprinkles.
Ribbons inside the card are only glued at the rear ends. This will allow you to place a gift card, a photo or whatever you want!

Sunday, 19 January 2014
Calendar 2014
Medium size calendar lined with kraft paper and decorated with metal, lace and ribbon.
[gallery ids="95,94,93"]
[gallery ids="95,94,93"]
Monday, 6 January 2014
Birthday Card
Greeting card made of cardboard and decorated with paper, small flowers, ribbons, lace and metal sheets. Embossed paper inside the card is used.
[gallery ids="98,99,100"]
[gallery ids="98,99,100"]
Thursday, 2 January 2014
Large wooden box - vintage
The large wooden jewelery box is decorated in vintage style. Ribbons, lace and metallic embellisments match the earthy shades and aging processing.
[gallery ids="105,104,103"]
[gallery ids="105,104,103"]
Subscribe to:
Posts
(
Atom
)